![]()
 Home
Home Products
 Cameras
Launch Monitors
Cameras
Launch Monitors Software
 Enclosures
 ProTee
 Golf Simulators
 Tech News
 View Cart
![]()
Custom orders
If you require a custom size screen and are not sure how to place the order via this web-site
please send us your order requirements via email and we'll send you an itemized quote with a link to our payment system.

Carl's Curved Screen Enclosures
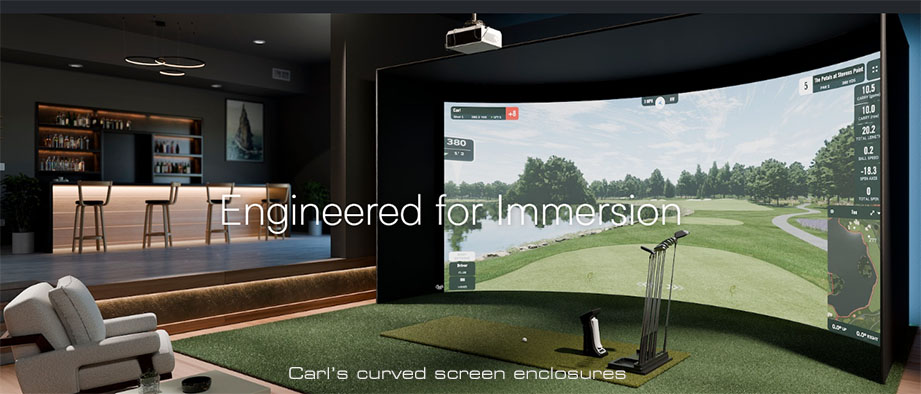
We also stock the new Carl's curved screen enclosures
Priced from $ 4,894.00
Click above image to read more...
![]()
![]()
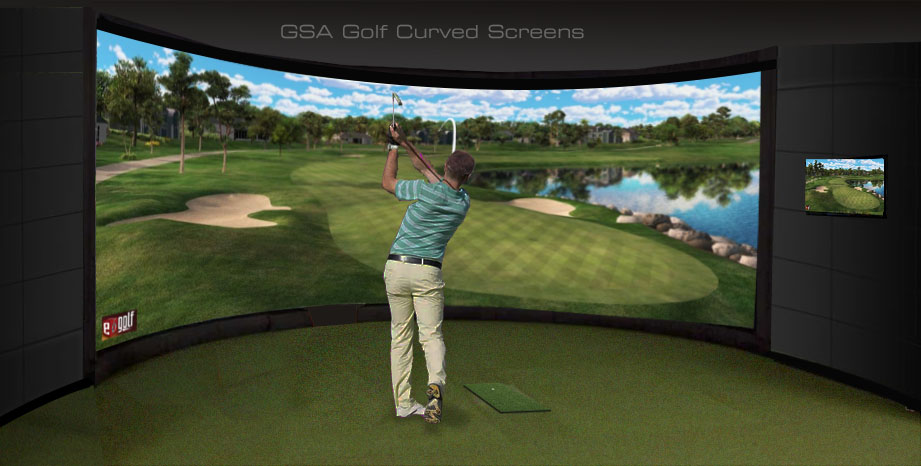
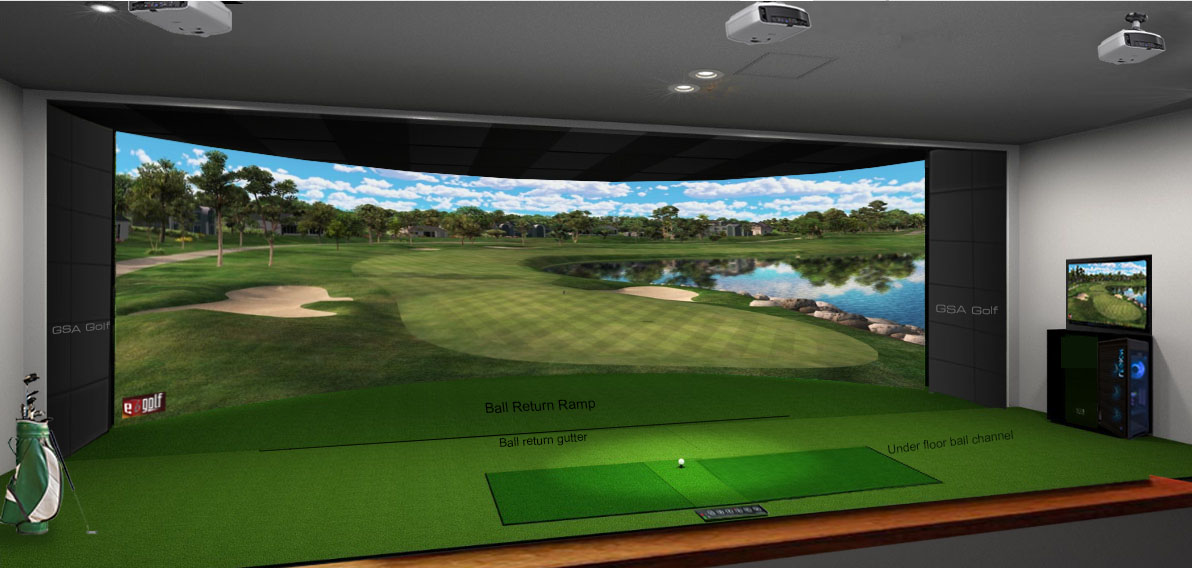
GSA Golf curved screens function with a single projector that has warping capability
![]()
Self standing curved screen frames
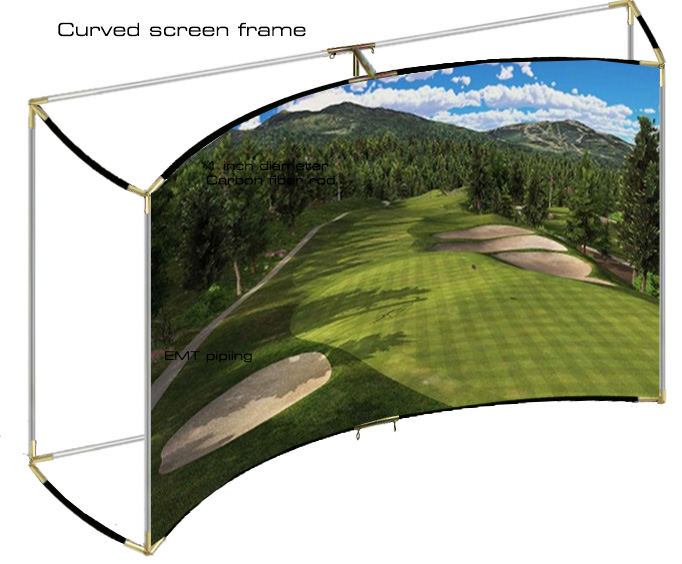
Complete curved screen with frame and premium 3 layered screen
16 ft wide x 9ft or 10ft high
Other sizes also available
$ 2,599.00
![]()
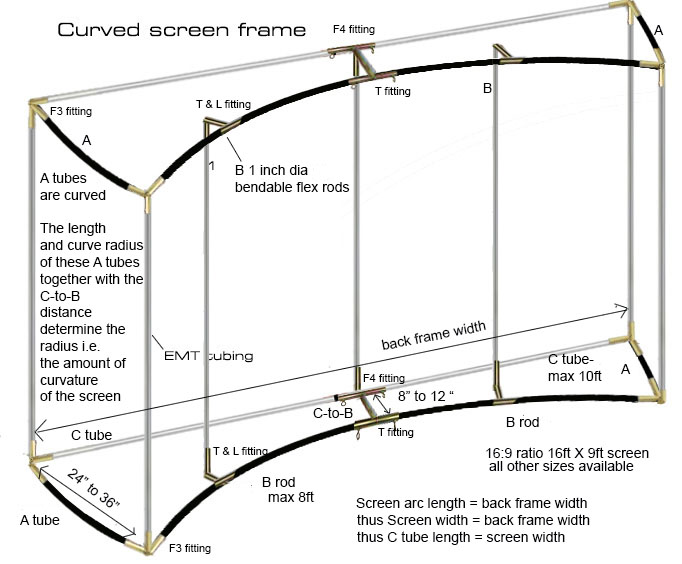
The curved screen frame consists of a number of 1" diameter flex rods and tubes connected via pipe fittings
![]()
Parts included
1. 4 X flex B rods. 8ft long each
2. 5 X flex A rods. 4ft each
3.4 X C tubes (10ft EMT conduit pipes)
4. 7 X Vertical pipes (10ft EMT conduit pipes)
5. 2 X F4 fittings
6. 8 X F3 fittings
7. 4 X L fittings
8. 6 X T fittings
9. 6 X 8" T to L tubes
 -
- -
-
![]()
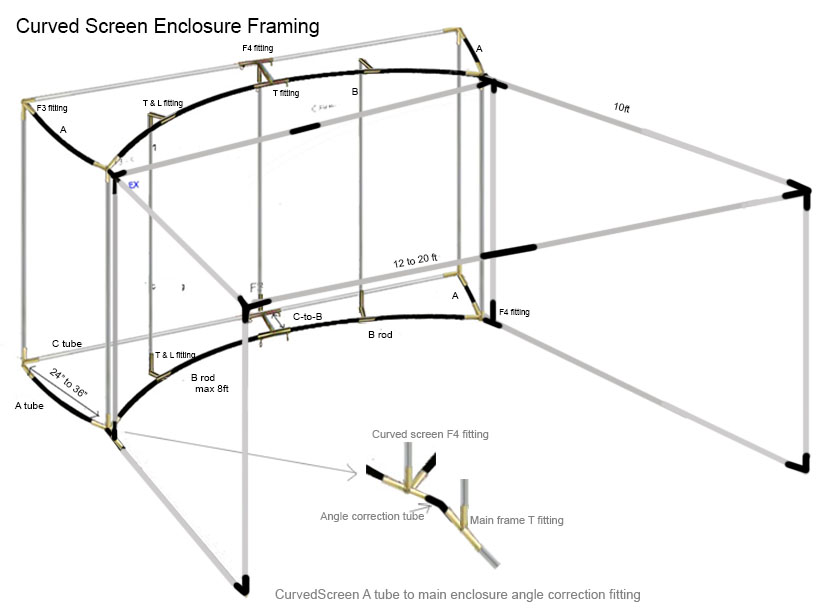
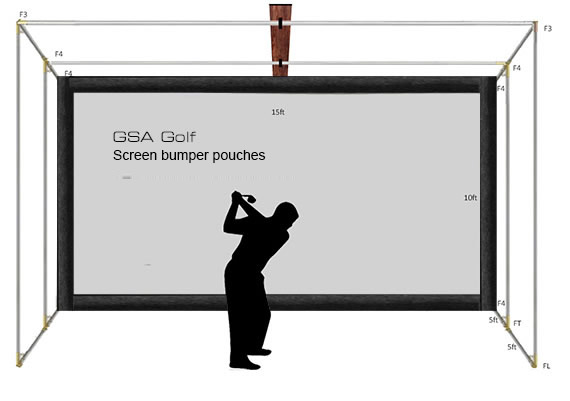
Frame Assembly instructions
Above image courtesy: Chip Eichelberger, THE energy source for your event! GetSwitchedOn.com
1. Starting at floor level, connect the C tubes to the F4 fitting at the back center of the frame
and the 2 F3 fittings at both of the C tube ends.
2. Connect the CB rod to the center F4 fitting and the T fitting as shown above.
3.Connect both A flex rods to the F3 fittings at the ends of the C tubes
4. Connect both A flex rods to the F3 fittings at the ends of the C tubes and 2 F3 fittings to the ends of the A rods
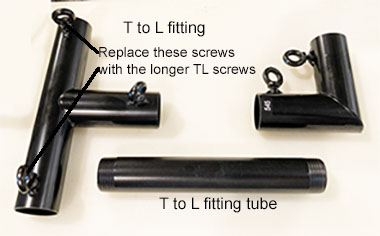
6. Slide the T fitting into the B rod for the TL fitting combo
7. Connect the left side B rod the CB T fitting and bend the other end back to fit the A Rod F3 fitting
8. Connect the TL rod to the TL combo and the L fitting to the other side
9. Repeat for the right side
10.Connect all vertical frame height EMT pipes to the lower fittings
11. Repeat the above procedure for the top half of the frame
Above image courtesy: Chip Eichelberger, THE energy source for your event! GetSwitchedOn.com
Quote from "www.draperinc.com"
Curved projection screens offer several key advantages over flat projection screens.
A curved screen helps offset pincushion distortion from a horizontal expansion lens, and also wraps the image around your periphery more than a flat screen for greater engagement with your projected image.
In addition, the curved image is subject to less ambient reflected light from your room, while your projector’s light is more accurately reflected by the perfectly smooth viewing surface for an ideal picture.
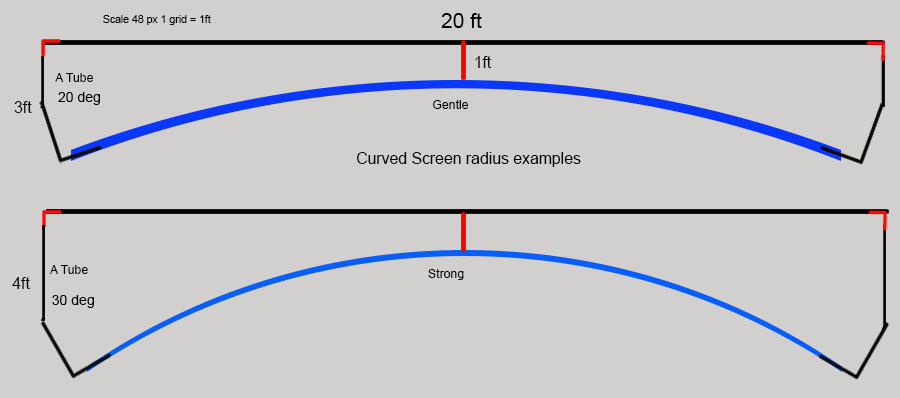
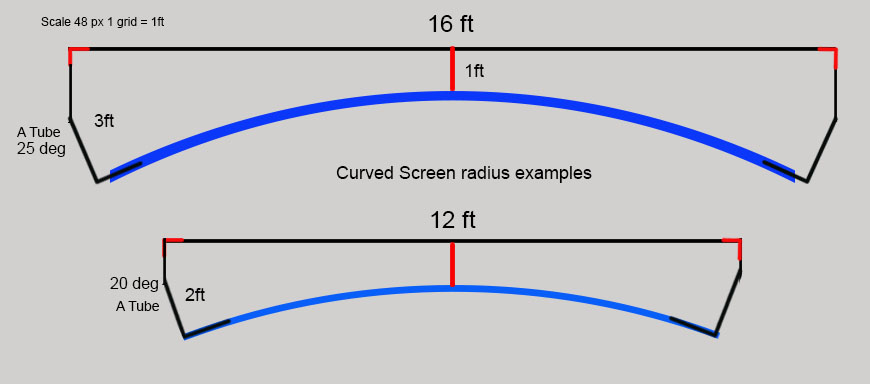
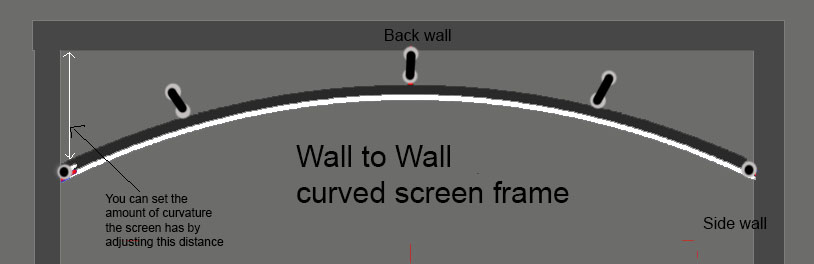
The amount of curvature is determined by the C to B distance and the length of the "A rods"
"A Rods" would normally be in the 3.3 ft range and "B tubes" in the 8 ft range for a total screen width of 16 ft
![]()
Curved Screen Side wall gap
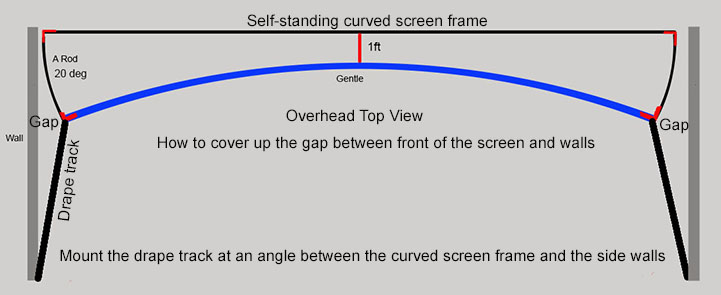
When using the self-standing curved screen frame,
there will be a gap between the side walls and the front of the screen.
If using drapes for the side walls of the enclosure, the gap can simply be covered by
mounting the drape tracks at an angle as shown above.
If there are no side walls and you're okay with angled drapes,
this method works well
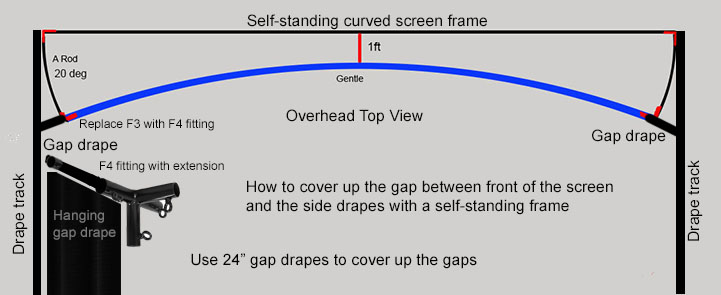
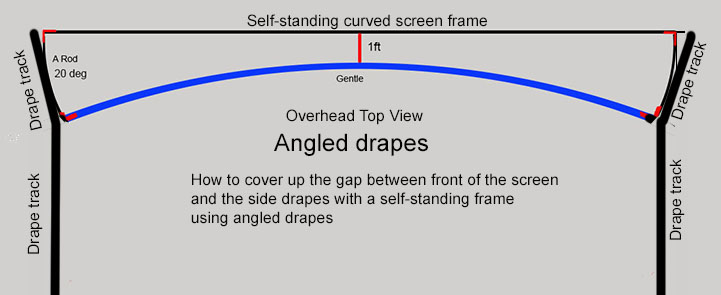
If there are no side walls and you want straight side drapes,
then gap drapes have to be mounted to the frame in order to cover up the gap

$ 249.00 each
Gap drape with 4 corner fitting, extension rod and 24" x 10ft drape with grommets
![]()
Curved Screen Tubing and Rod set

Curved screen size 19 Tubing set
$ 1,399.00
freight shipping for tubing (80 lbs) at least $200 depending on your location
![]()
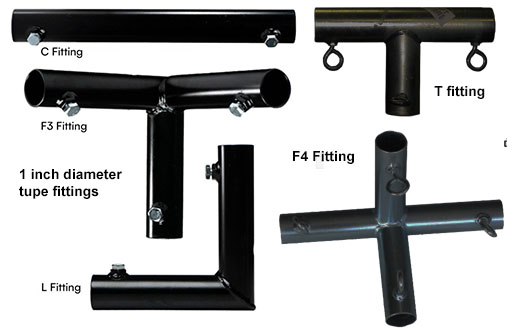
Conduit tube and rod fittings for curved screen frame
Set of 18 curved screen frame tube fittings
8 F3 + 2 F4 + 4 T + 4 L
$ 480.00
Note: this is just the frame fittings.
You'll still require the 11 x 1 inch diameter conduit tubing from your local hardware store.
Plus 4 curved A rods + 4 B flex rods
![]()
Individual frame fittings
C, L, T, F3 or F4
$ 30.00 each
![]()
Budget Curved Screen tubing and rods
Set of curved A tubes and B rods only
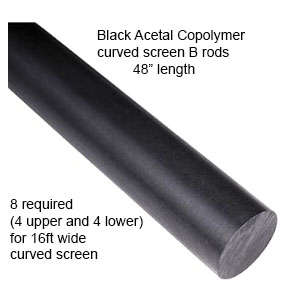
While the straight conduit piping can easily be sourced from local hardware stores,
the specialized curved screen A tubes and B rods are not available in stores.
This set of 4 x A and 4 B rods solves the problem.
$ 599.00
![]()
Strong curve upgrade
For those that want an accentuated curved screen
we offer extensions to the A Rods that allow up to a 6ft screen extension on either side.
The upgrade consists of 4 more 39" A rods with C fitting connectors
$ 299.00
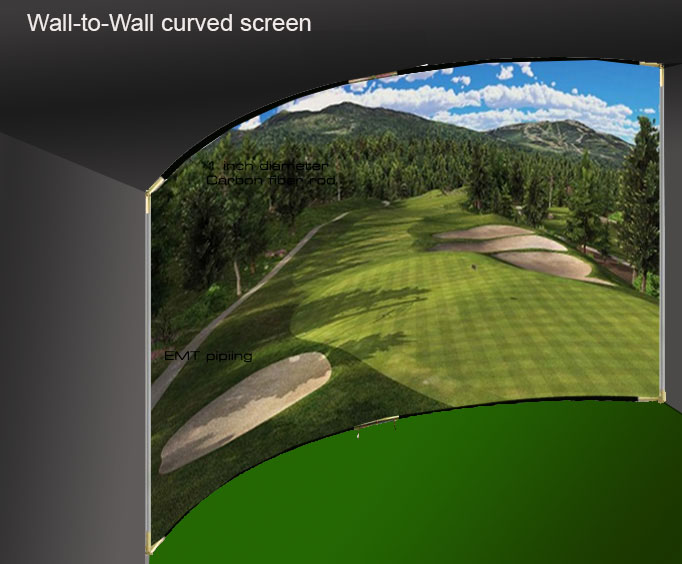
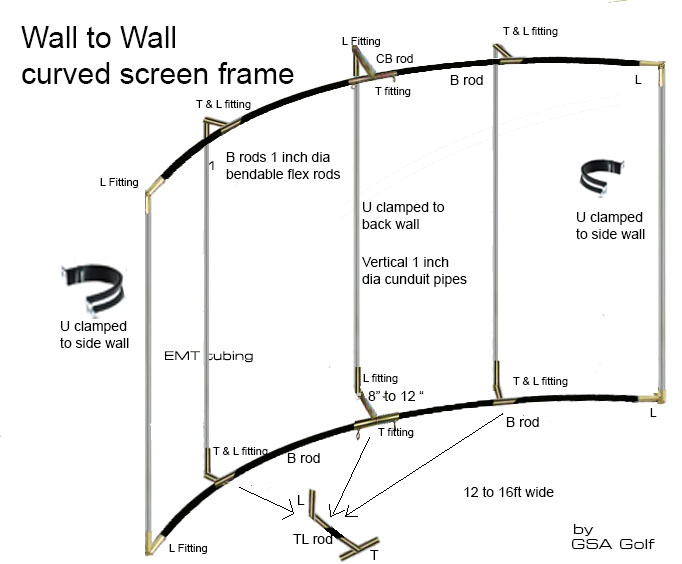
Wall to Wall Curved Screen frames
For those that have a dedicated room and want the curved screen to be flush
with the side walls so that there are no side gaps.
--
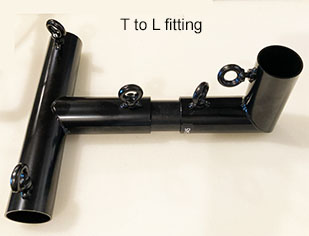
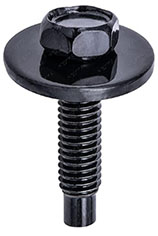
The frame comes with a number of L and T fittings and replacement screws for the T to flex rod fittings
Parts included
1. 4 X flex B rods. 8ft long each
2. 5 X Vertical pipes (10ft EMT conduit pipes)
4. 6 X 8" T to L tubes
5. 10 X L fittings
6. 6 X T fittings
7. 12 X U clamps
8. 16 X replacement screws for fastening the B flex rods to the L and T fittings
Walll to Wall Curved screen frame Tubing set
$ 899.00
![]()
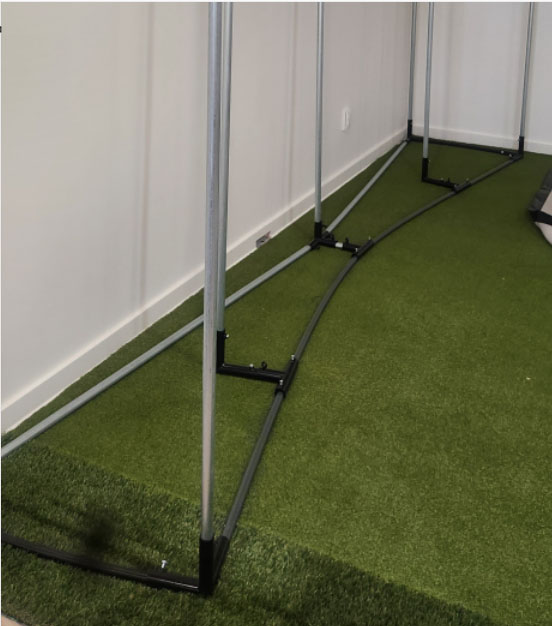
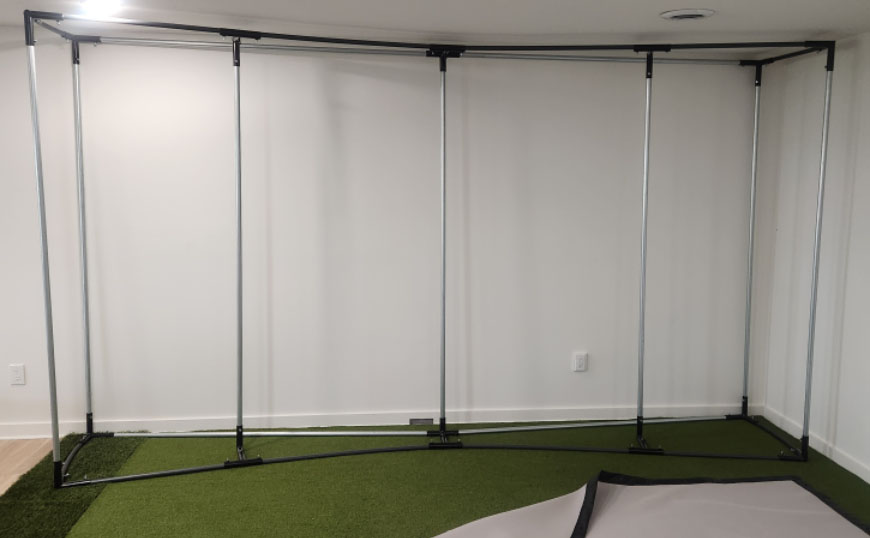
Wall-to-Wall curved Frame Assembly instructions
1. Start by connecting 2 L fittings to either end of the center strut and clamp to center of the back wall
Note that the conduit piping for struts only come in 10ft lengths,
so if your required height is less than this, then the piping would have to be cut down to suit.
2. Connect a T-to-L tube and a T fitting to the 2 L fittings at either end of the center strut
3. Connect one side of a B flex rod to the T fitting and bend out to your desired screen curvature
and mark where on the side wall this would extend out to.
4. Do the same for the opposite side wall
Note that the flex rods only come in 8 ft lengths ( i.e. for a max screen width of 16ft )
if your desired screen width is less than this, then the flex rods would have to be cut down to suit
5. Do the same for the opposite side wall
6. Connect L fittings to the left and right struts (top and bottom) and clamp them to the side walls.
7. Slot in the Mid strut T fittings to the flex rods and connect the flex rods from the center strut T fitting to the side wall strut L fittings.
8. Connect L fittings to the mid strut positions ( i.e. half way between the one side wall to the center strut) and fit the mid conduit to them
9. Clamp the mid L fittings to the both the floor and ceiling
10. Attach your screen to the top and bottom flex rods and left and right struts with bungees
![]()
Wall to Wall Curved screen frame Tubing set with Hi-contrast premium 12 x 9 screen
Including double grommets and bungees
$ 1,999.00
![]()
Wall to Wall Curved screen frame Tubing set with Hi-contrast premium 14 x 9 screen
Including double grommets flaps and bungees
$ 2,199.00
![]()
Wall to Wall Curved screen frame Tubing set with Hi-contrast premium 16 x 9 screen
Including double grommets, flaps and bungees
$ 2,399.00
Custom sizes also available
Let us know what available room size you have (width and height) and we'll make the screen to match.
Screen sizes will usually be 6 inches less in width and height to allow for bungees and curvature
![]()
An alternative to the above curved screen frames
is our Ceiling Bracket curved screen mounts
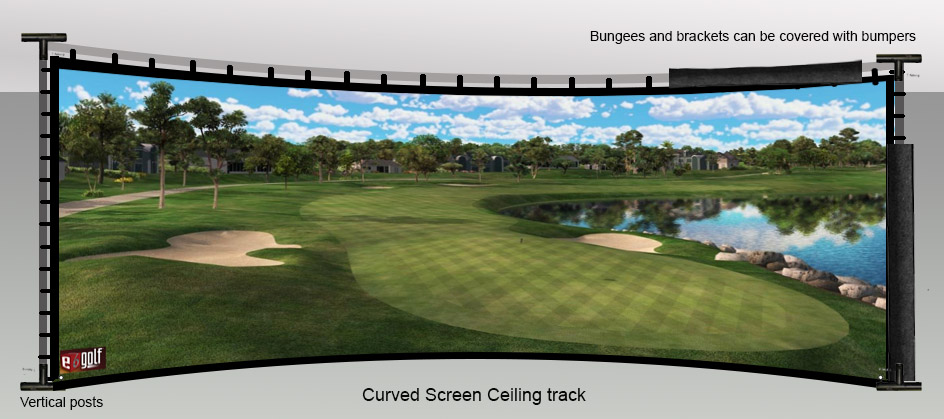
For those that have a dedicated golf simulator room, you can now simply attach a curved screen
to the curved track that is mounted on the ceiling.
This method eliminates the requirement to make up a frame.
Other than the price and simplicity of this method,
is that the curved screen can match your exact room width.
In contrast to a frame that will have 6 to 12 inch gaps at the far ends,
your curved screen will fit flush to your room width.
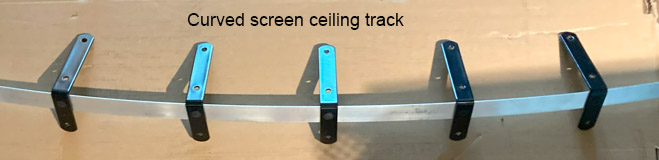
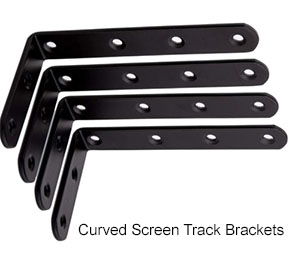
![]()
for up to 16ft wide screens
What's included:
2 X 8 ft long X 1" wide aluminum bendable bracket guides for up to 16ft wide screens
32 brackets with fixing hardware (screws)
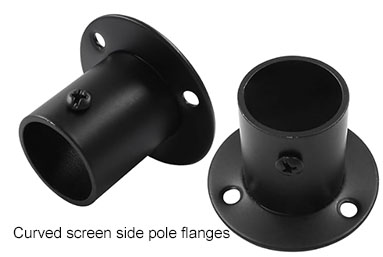
4 side pole flanges
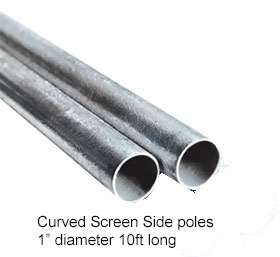
2 x 10ft 1" diameter long side poles
$ 399.00
Optional extra Floor 32 bracket set
$ 90.00
Used for those that would like the bottom of the curved screen to be fixed to the floor
![]()
for up to 24ft wide screens
3 X 8 ft long X 1" wide aluminum bendable bracket guides for up to 24ft wide screens
48 brackets with fixing hardware (screws)
4 side pole flanges
2 x 10ft 1" diameter long side poles
$ 499.00
![]()
Wall to Wall Curved screen ceiling mounted set with Hi-contrast premium 12 x 9 screen
Including double grommets, flaps and bungees
$ 1,399.00
![]()
Wall to Wall Curved screen ceiling mounted set with Hi-contrast premium 14 x 9 screen
Including double grommets, flaps and bungees
$ 1,599.00
Wall to Wall Curved screen ceiling mounted set with Hi-contrast premium 16 x 9 screen
Including double grommets, flaps and bungees
$ 1,699.00
Custom sizes also available
Let us know what available room size you have (width and height) and we'll make the screen to match.
Screen sizes will usually be 6 inches less in width and height to allow for bungees and curvature
![]()
The curved screen guide allows you to set the curvature to any radius and any width from 12 to 20 ft.
Mounting Instructions
First off, make sure your ceiling is capable of supporting the weight of a screen.
If it's drywall, ensure that it's thickness is at least 1/2 inch.
If it's just plaster, then this method of suspending the screen will not work.
Step 1:
Locate the center of where the screen is to be mounted and mount 2 brackets (left and right) there.
Note that there are 2 half's of guide : left and right
Step 2.
Starting with the left side, drill a hole (with the supplied drill bit) at one end of the aluminum guide
and attach it to the bracket with the supplied self tapping screw.
Step 3.
Bend the other end of the aluminum guide out to the desired curvature
and attach another bracket to that end and mount to the ceiling.
Step 4.
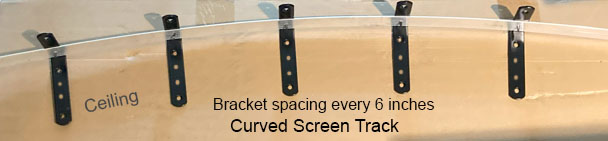
Depending on your screen's grommet spacing, slide in the brackets along the guide to match your screen's grommet spacing
and screw in the brackets to the ceiling at those points.
Step 5.
Repeat the procedure for the right side of the curved screen.
Step 6.
If using the optional extra floor bracket mounts.
Repeat the procedures 1 to 5 but attaching the brackets to the floor instead of the ceiling
Step 7.
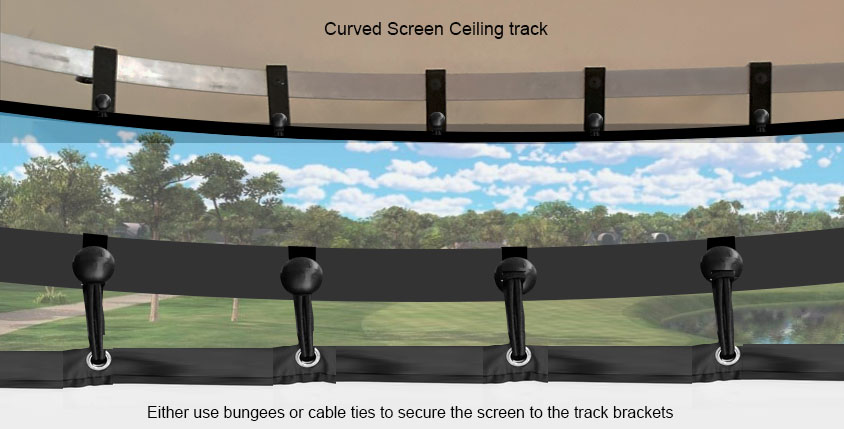
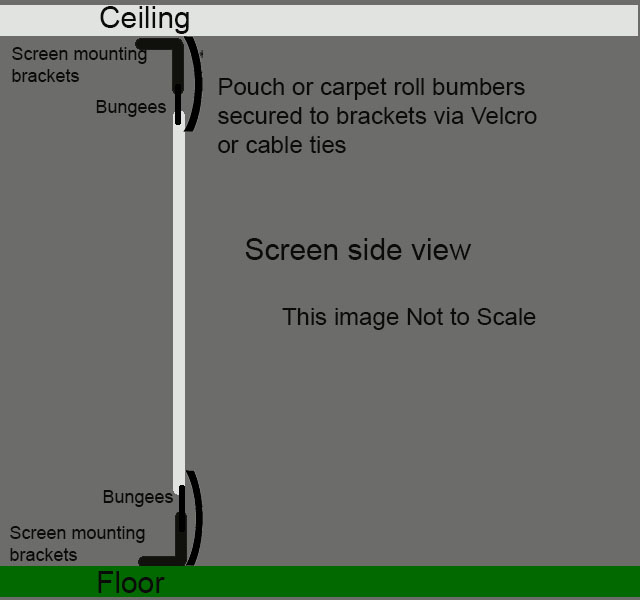
Attach the screen to the ceiling and floor mounted brackets via bungees or zip ties.
Step 8.
Mount the side vertical poles with the supplied pole flanges and attach the screen to the side poles via bungees or zip ties.
![]()
Methods of attaching the screen to the brackets with bungee cords
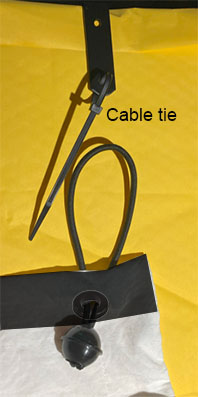
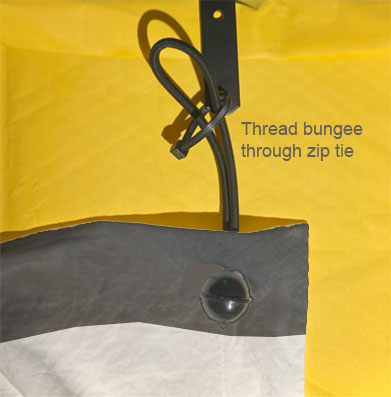
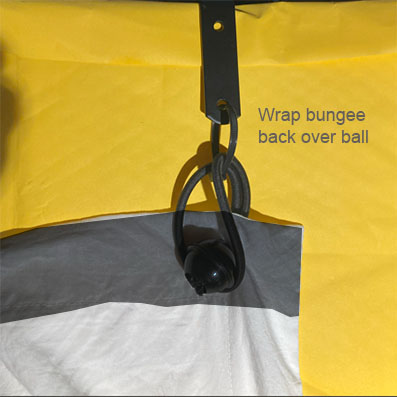
Using a loosly tightened zip tie
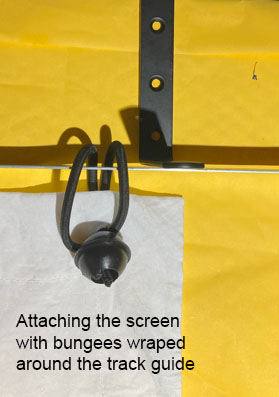
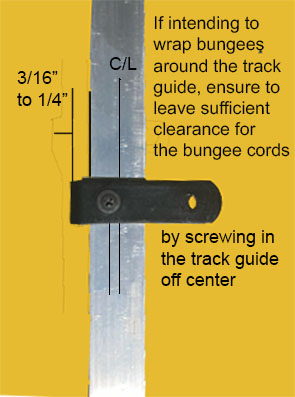
Wraping the bungee around the track guide
Note that this method requires screwing in the track guide to every bracket with the supplied self taping screews
![]()
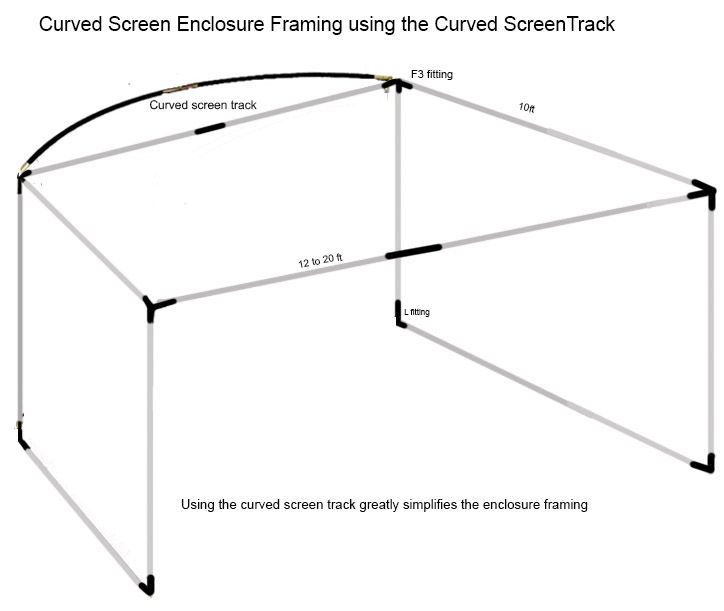
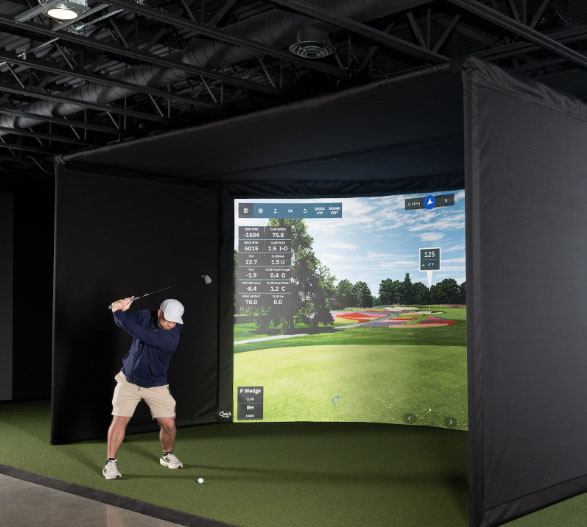
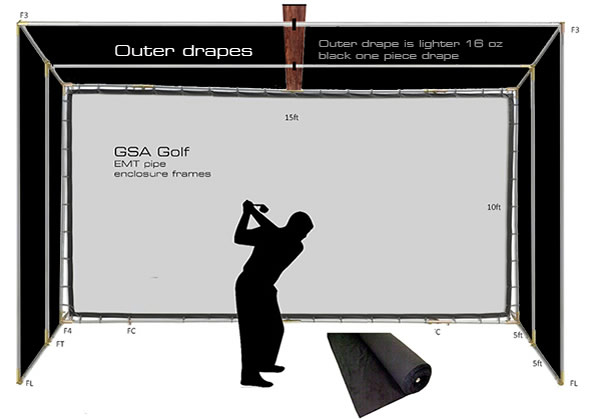
Curved screen cage enclosure
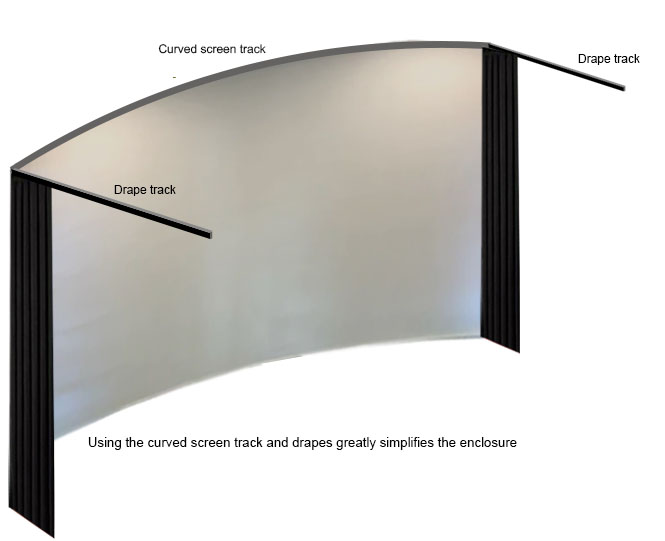
Curved screen drape enclosure
If using drapes and the curved screen track, then no enclosure framing is required
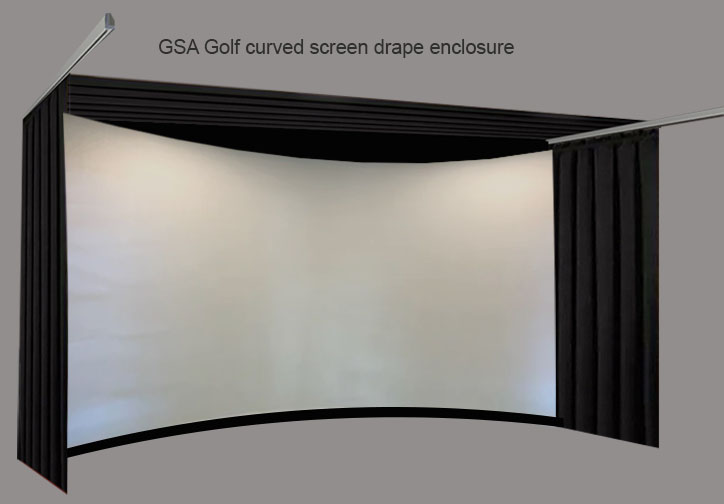
If using drapes and the curved screen track, then no enclosure framing is required
![]()
The Curved Screen Itself


![]()
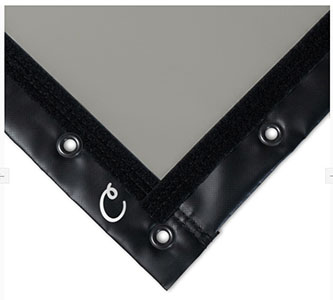
New! High Contrast Screens
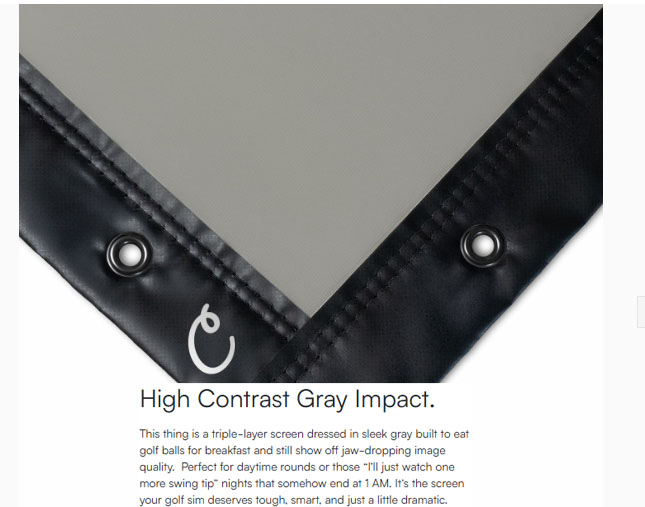


Build your best golf simulator with High-Contrast Gray Impact Screens.
Made from the best thick, multilayer fabric, using the tightest weave possible,
this hitting screen is designed to dramatically enhance image quality in indoor golf environments.
Click the above images to purchase your screen
Note: there is no such thing as a curved screen itself.
A curved screen is only a regular screen that is mounted on a curved track
![]()
How to calculate the actual screen width
for a particular screen curvature depth or angle
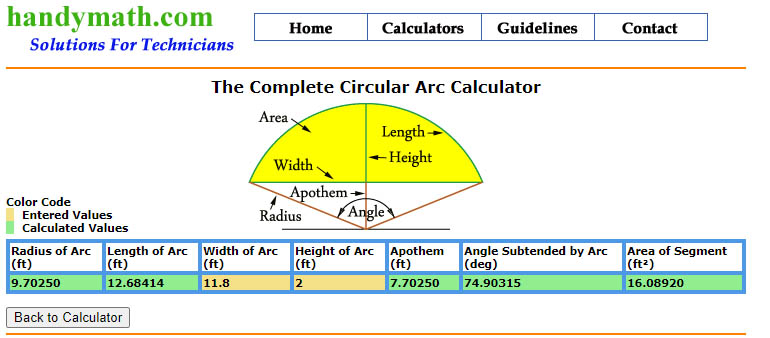
Using the above online calculator you can determine the actual screen width for a particular screen curvature.
If you know the width of the available space for the screen
"Width of Arc"
and you know how far out the two far sides will extrude compared to the center of the screen
"Height of Arc"
then the actual screen width will be
"Length of Arc"
New GSA Golf enclosure parts selection
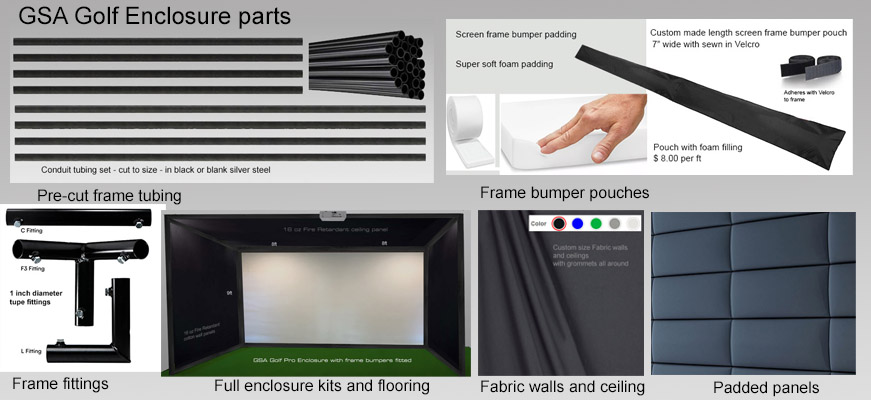
Click above image to read more...
Curved screen enclosures
>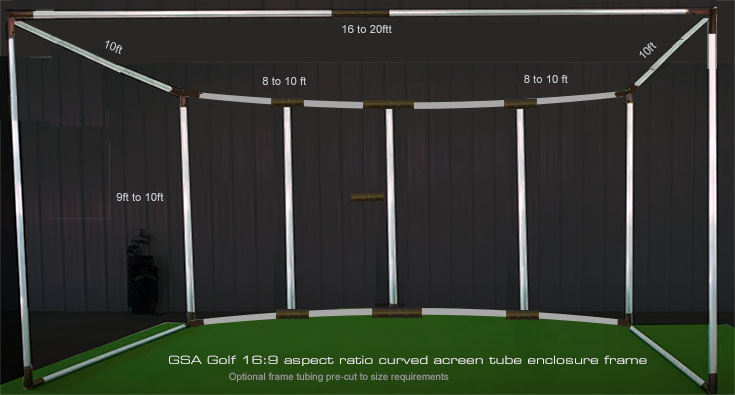
10ft deep curved screen enclosures
16' to 20' wide - 9' to 10' high - 10ft deep
with premium 3 layer screen plus side and ceiling walls
plus all tubing, tube fittings and frame bumbers
$ 4,999.00
>
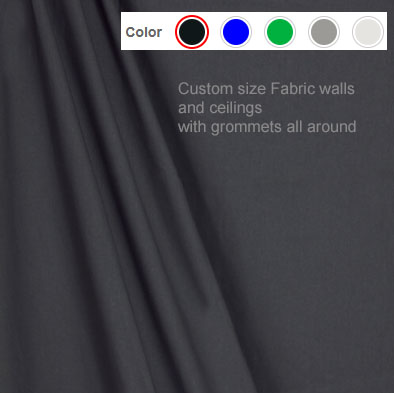
Curved screen enclosure walls
Custom Size Hi quality Fabric walls and ceilings
Note that our fabric walls and ceilings are made with high quality heavy 16oz fabrics. i.e. not just cheap vinyl
Click above image to read more about enclosure walls and ceiling
![]()
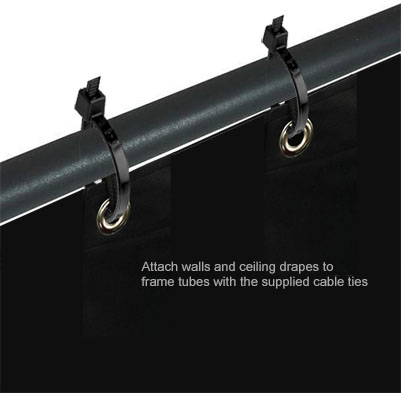
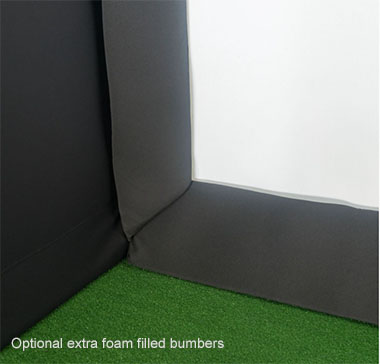
Frame Bumpers
Note: all full frame enclosures include the standard frame bumpers
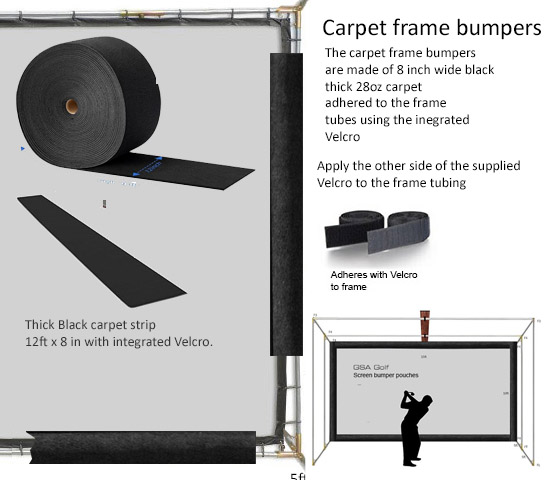
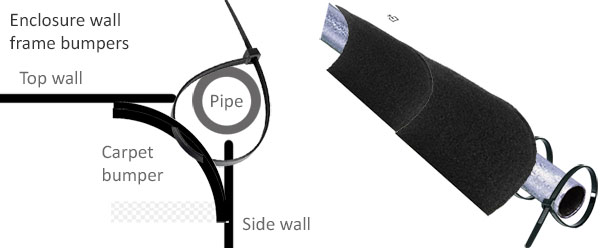
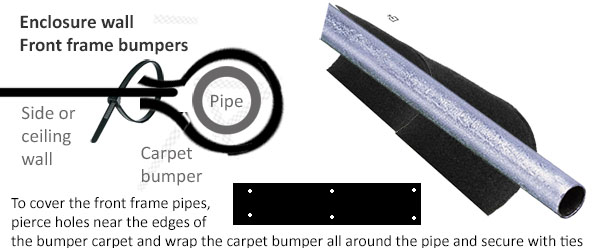
Click above image to read more about enclosure frame bumpers
![]()
Flooring

Click above image to read more...
15ft * 15ft Price $1,899
![]()
15ft * 12ft Price $1,599
Fiberbuilt Golf mat systems
with interlocking foundations
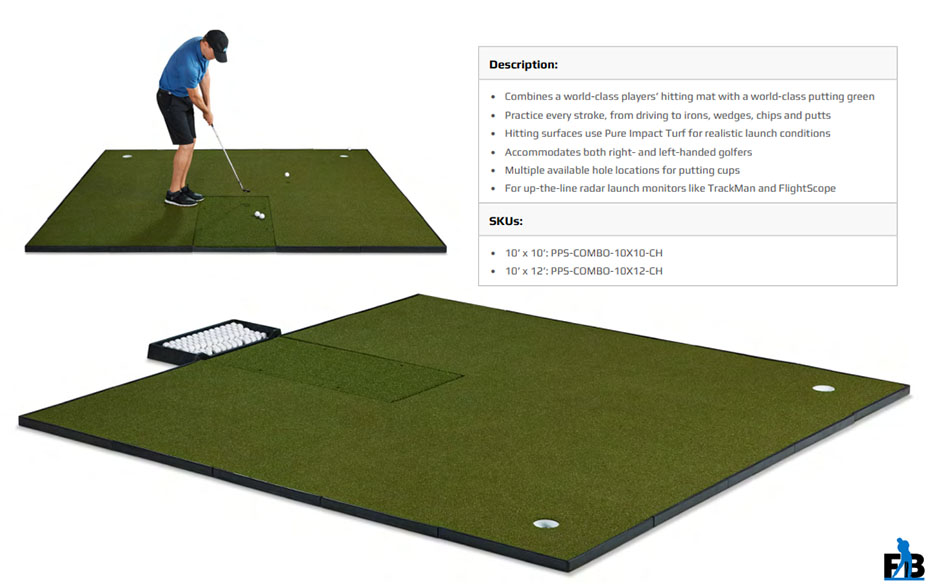
Raised platform turf flooring
Click above to read more
![]()
Carl's Curved Screen Enclosures
We also stock the new Carl's curved screen enclosures
Priced from $ 4,894.00
Click above image to read more...
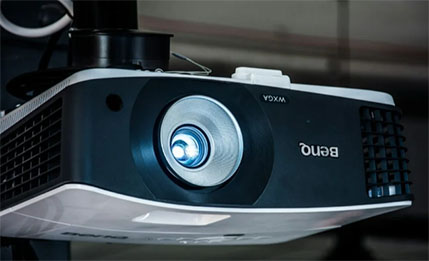
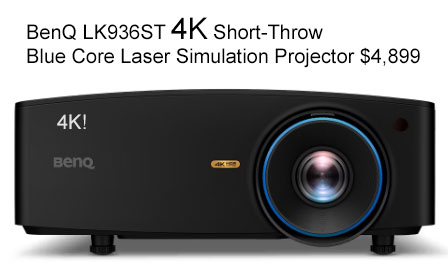
Projectors
Curved screens with a single projector
 -
-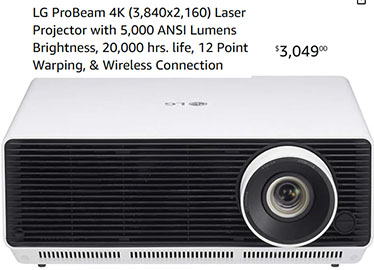
In order to curve the image coming out of the projector, you will require a projector with warping capabilties.
The above 2 projectors are recommended
Click above image for more options...
![]()
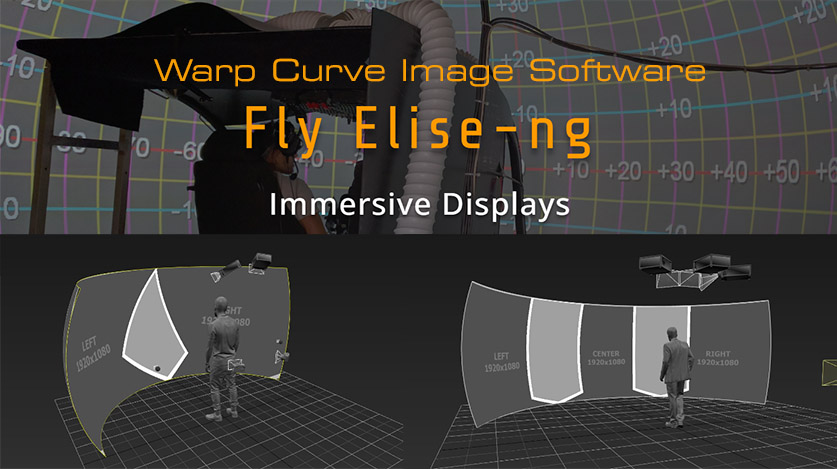
Curved screens with Multiple projectors
Please note that a curved screen will require either a projector with warping ability
or special additional software
for the image coming out of the projector to also curve and match the curvature of the screen when using multiple projectors.
Click the above image to read about curved screen warping software
Screen and Frame Bumpers
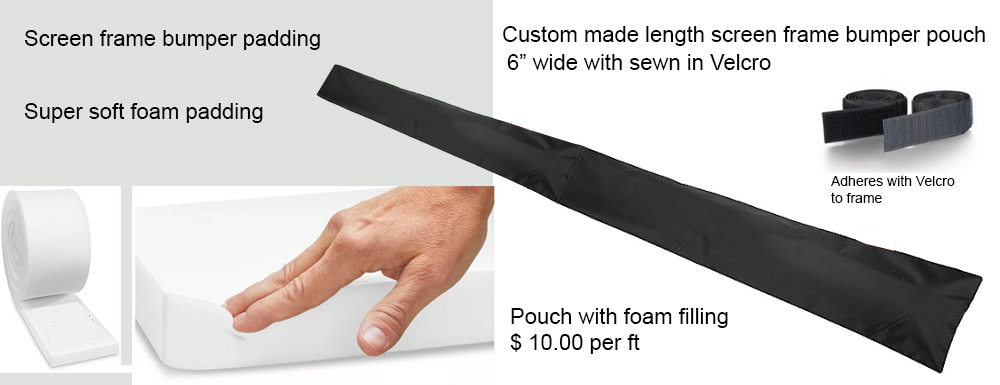
The screen bungee cords and tubing are covered with a screen bumpers
Use these foam bumpers to protect direct ball contact to the screen frame
$ 20 per ft
Custom lengths available.
Let us know what each individual length should be (i.e 6ft, 8ft, 10ft, or any other length)
Select required footage when checking out
![]()
Lower cost Screen and frame Bumpers
Select footage when checking out
$ 4.50 per ft
Contact us
![]()

![]()
![]()
![]()
![]()
Warranty and Return Policy
Warranty is 1 year for the cameras
Returns must be made within 30 days and have a 15% to 20% restocking fee
Please read our legal notice via the link below regarding warranty periods and return policy
Note that a 15% to 20% re-stocking fee (depending on condition) will be charged in the event of a return
Customer is required to return the product at own expense. ie, GSA Golf do not send free return labels
Note: this 30 day return policy does not include 3rd party game software such as TGC,
enclosure items such as screens, flooring, drapes, panels etc.
i.e. it is solely for camera tracking systems
Please read our legal notice via the link below regarding warranty periods and return policy
![]()